We keep track of fabric swatches that inspire us by creating digital palettes, as in a fabric journal. In this tutorial we'll explain how you can do this on your own computer, without complicated software. This approach can also be used to assess the value (lightness or darkness) of various swatches. It's fast, easy, and free !
In design, it has been said that "color gets all the credit, but value does all the work". As with the batik swatches shown below, it can be difficult to tell which fabric is lighter or darker. Can you tell which of these swatches is the darkest?
You'll be able to collect swatches on a single page (a PowerPoint slide) and then convert them to grayscale to compare their relative values. You can use images you download from fabric manufacturers (we'll explain how*), or you can scan your own fabrics on a flatbed scanner to create the images.
If you already know how to open Microsoft Office PowerPoint, simply scroll down to Viewing Swatches in PowerPoint and follow the 6 easy steps. If you are not sure if you have PowerPoint, here's where to look for it:
How to locate PowerPoint on your computer
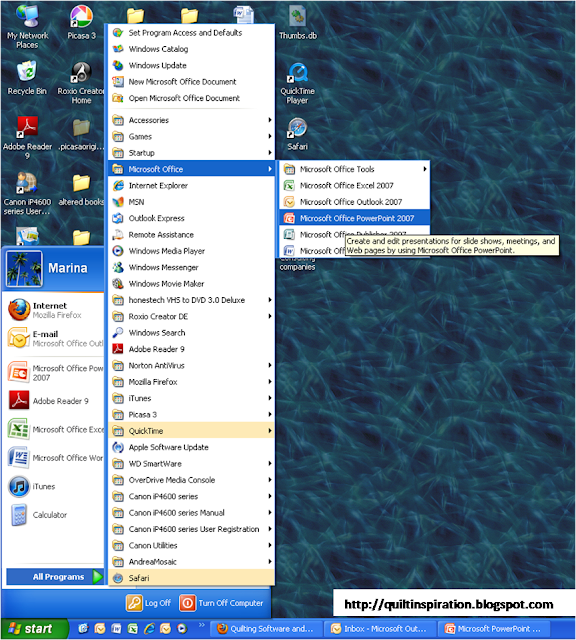
1. Click on the start menu button at the lower left of your screen.(note: we're using a PC with Windows XP and Microsoft Office 2007. If you have Windows Vista, various menu items will be in different places, but you should be able to follow the tutorial).
2. Click on All Programs to see the programs on your computer. The list will open and look something like this:
3. Locate Microsoft Office and move the cursor over it to pop up the contents of the folder (see below). You should see Microsoft Office Tools, Microsoft Office Excel, and other programs. Click on Microsoft Office PowerPoint to open the program.
Viewing Swatches in PowerPoint: 6 easy steps
Step 1. Open PowerPoint. A screen will open like this:
Step 2. Get rid of any title and subtitle boxes.
Select the title box by clicking on the dotted outline of the box, then hit the delete key on your keyboard. Do the same for the subtitle text box (select it, then hit delete). (Tip: you will know that a box has been selected when a green dot or “handle” appears at the top center of the box, as shown below).
Step 3. Download the lime-lavender-turquoise swatch montage to your computer.
Right-click* on the lime-lavender-turquoise swatches shown at the top of this post (for convenience, we've already grouped them into a set of three) and click on Save Image As (shown below).
When the Save Image box appears, as shown below, use the drop-down menu to choose a folder to Save In (such as "My Pictures"), type in a File name if necessary ("fabric swatch montage") and click Save. (Tip: The file will be saved as a JPEG File Interchange Format (*.jpg) as shown below. You can also save it as a .png file, but the file size will be larger).
Step 4. Insert the picture you just saved into the PowerPoint slide you just opened.
At the top of the PowerPoint screen, locate the tab that says Insert (see below) and click on it to see the drop-down menu items ( “picture”, “clip art”, “photo album”, etc.) Click on Insert > Picture.
Step 5. When the "Insert Picture" box pops up, select the fabric swatch of interest, then click "Insert".
Use the drop-down menu if necessary to locate the folder that contains the picture you just saved. Click to highlight the file named “fabric swatch montage for tutorial.jpg”, as shown below. (Tip: The thumbnail view we've shown below makes it handy to find your swatches without having to remember the exact file name. If your files show up as a list of file names instead of thumbnails, you can change them to thumbnails by clicking on the drop-down "views" menu; it is the little icon that appears at the upper right corner of the Insert Picture window, just under the red "X").
Once the swatch file is highlighted and you click on Insert, the picture will be pasted into your PowerPoint slide.
Step 6. Change the View to Grayscale.
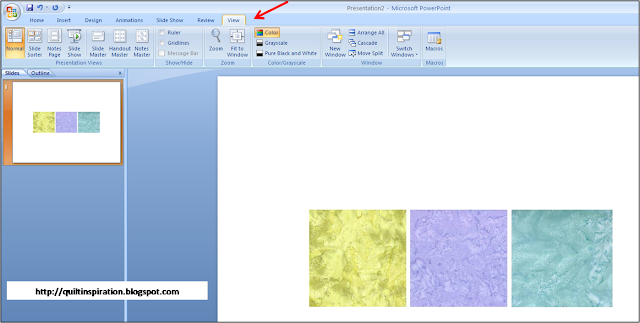
In PowerPoint, click on the View tab, as shown below (red arrow). Notice the box that is automatically highlighted, that says Color, and just below it, Grayscale (and below that, Pure Black and White).
Click on Grayscale to see the swatches in grayscale, as shown below.
In Grayscale, it is easy to see that the two swatches on the right – which were lavender and turquoise - are actually very similar in value. (We would have guessed that the turquoise was darker than the lavender). The swatch on the far left, which was lime green, is much lighter than the other two, as we would have guessed. Note that you can toggle back and forth between grayscale and color, by clicking on “Back To Color View” at any time.
Finally, one more tip: to re-size a fabric swatch that is too large for the slide, first click on the image to select it. Then, using one of the handles that will appear on each corner of the object when it is selected, click and drag with your mouse to re-size the image. (In later tutorials we’ll show how to maintain the "aspect ratio" (height-to-width) when re-sizing an object).
*Notes: All manufacturers show swatches of their current lines, and some of them - like Moda - enable downloading of entire collections. To save online swatches to your own computer, follow step 3 above. Right-clicking means, while the cursor is over a swatch, click the right-hand mouse button and then follow the prompts to Save As. (Note that this approach is designed for analyzing fabric swatches for your personal use, such as in deciding which fabrics to purchase for a new project. Be aware of copyright restrictions when you are downloading images from the web.)
p.s. This is our first tutorial, and we’d love to hear your thoughts. We realize that EQ, for example, has built-in swatch features. Do you already use your computer to analyze fabric swatches?
|
|
|---|


