Showing posts with label long arm. Show all posts

Monday, January 14, 2008

Twisted Seams VS. Bulky Intersections


So, learning how to press your block the tried and true method is to press all seams to the side, thus providing strength to the seam by not pressing it open as in sewing clothing. This also provides hand quilters the perfect seam to stitch in the ditch. A twisted seam is a BIG no-no and aggravation to the hand quilter.


Being a Machine quilter and actually dis-liking stitch-in-the-ditch and avoiding it like the plague, what I have found to be a huge hindrance to the machine quilter is bulky seams. What happens to me, is I'm quilting along and the hopping foot of my machine comes to the bulky intersection and can't go over it, thus it bounces off and creates a lump in my wonderful feather. Which no longer looks wonderful cuz of the bump. Or how about cruising along with a pantograph and BAM you run into a bulky intersection and now your cute pattern has a lump in it. A bulky intersection is the kind of seam you find at the center of a pinwheel or a lemoyne star. When there are 8 fabrics converging at the center of the block, and 8 seams, which means 16 layers of fabric. AAAHHHH! press that to the side and it makes for a huge pile of fabric.


So what are the solutions? Well, I learned a techinique from my friend Niquie where you can loosen some of the threads on the seams which are crossed by the final stitching and open up the intersection and press it, this really helps to eliminate the bulk in a four-patch type seam intersection.


But what are other options?


And especially for those flying geese points?


Leave your comments and let me know what you think about twisted seams vs. bulky intersections. Happy Quilting! Lauri


PS Thanks to my Cousin Chris for her quilt, in all the examples.

Monday, January 7, 2008

Ready to Quilt!!!

Well, the machine got moved, but it took a bunch of effort to get the rest of the stuff out of the MIL apartment. Yes, I got the fabric moved out of the cabinets. I don’t think I have as big a stash as I first thought. But it’s enough to try and figure out where it’s going to go. I ended up using the cabinet the computer was in to hold un-quilted tops and put up some shelving in the back corner behind the machine which luckily holds most of the fabric. I’m also using the pegboard again!!! I put this up a couple years ago when the machine was in this situation before, but it’s been pretty much unused since I moved the machine. I’ve been tempted to take it down, but I didn’t!!! Now I’m so glad.
All the UFOs and fabric collections are put in plastic bins and labeled. It really helps to have labels on, so I don’t have to dig through the bins to figure out what’s in there. I just use address labels. I love Mary Engelbreit things so I found a cute flower on her website and put it on my labels to make them look cute.
I also have to work around the exercise equipment, but it works out pretty well. The treadmill is right next to the design wall, which kind or works well because I don’t have to stand on a stool to reach to the top of the wall so I can get a big quilt on there.
I’ve finally gotten the “family” quilt back on the machine! I put it back on after I finished the jacket, but never got any quilting done on it because I had to take it off to get the studio moved. Now that everything is mostly in it’s place I can finally get quilting again!!!

Thursday, December 20, 2007

The Jacket is Done!

Yea! The jacket is done and I've actually worn it twice and I actually really like it. At first it seemed a bit big and stiff, but I washed and dried it and it softened up a bit.

So this is how I made it. I cut the ribbing off the bottom, cuffs and neckline. I cut up the sides and took out the stitching in the sleeve seam. Then I folded the front in half and cut up the middle. I spread it out on the cutting table and made sure it would lie flat. It didn't have raglan type sleeves like most sweatshirts and I think I would have preferred raglan sleeves. It would have laid flatter. But Oh Well, it's what I had. So I measured it from end of sleeve to end of sleeve and from bottom front edge to bottom back edge. I think it was 68" x 90". Making the lining a bit bigger. I used 3 1/3 yards folded in half the long ways and seamed it. Loaded it on the machine. Laid the sweatshirt on it and used safety pins to hold it down and rolled it up to make sure it fit before I started stitching.

I used Pam Clarke's 1" line stencil on a 45ยบ angle and marked the cross-hatching lines. I didn't use a ruler (too lazy) I just did wavy lines and went back and forth in matching grey thread. It was REALLY boring. But then I got to do the fun part and I added the vines and berries free hand in variegated threads. Yep, Superior Thread. I maybe should have ironed on some totally stable to keep it from puckering up. It only did a little bit and then I tried to be more careful. It's comfy and warm and even looks a bit stylish.

Friday, December 14, 2007

Doing Too Many Things!

So I really have been trying to get back to put something new on my Blog. But Craziness reigns around here. Tis the Season. Right? I have several things in the works and thought I'd share pictures of some of the projects I am in the middle of right now.


First is the Grandmother's Flower Garden that I'm using Ami Simms Invisible Applique techinique to hand piece. I don't have pictures because I want to show a little tutorial when I get a chance. So keep checking back for that. I don't have her book but saw a clip of her teaching it on The Quilter's News Network. It works Loverly, and I'm addicted. I love it because I can sit and do it in my comfy chair in the family room while the family watches a movie.

Second, I've decided that my extended family members deserve a quilt from me. I've made some for nieces and nephews, but I kind of skipped my siblings. So I put a top on that I've had for a while. Here's a picture, but I can't say who it's for right now. I'm working on having a consistent spine. Usually I just freehand it, cuz it's easy. I love feathers. You'll learn this as we go along. I can't help myself I just have to feather things. This is the first time I've tried this curl thingy. I really like how it's turning out.


Then I started a quilted sweatshirt. I took a class at Innovations in Seattle a couple years ago and learned how to do this. I came home and made one. I gave it to my friend Niquie. She loves it and gets bunches of compliments on it. I've told myself TONS of times that I'm going to make more. Then last year I actually bought a couple sweatshirts and guess what? I never did it last year, so here I am doing this year. Basically you just cut the sweatshirt apart. First cut off the ribbing from the bottom, sleeves and neck. Then cut up the sides and the sleeve seam. Then fold the front in half and cut up the middle of the front. I bought a really cute woven stripe and I love it, but because the shirt lays out funky to be flat the stripes won't quite be vertical on the back or front. But I'm going to use the leftovers to do bias binding around the edges and that will look awesome.


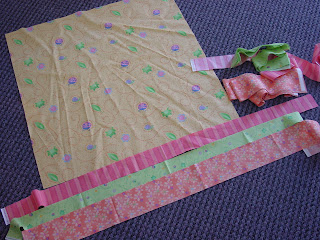
My Niece had a baby in October and I promised her a quilt for her little girl, and so I actually purchased a pillowcase kit because they didn't have any yardage of the cute fabric in the kit. So I'm just adding borders and going to quilt that up. Here's a picture of it laid out w/borders. My niece likes frogs, so the center panel and the green border have frogs, insects and cute sayings.


This is Santa's little helper. NOT! This is my 2 yr old that keeps interrupting mommy's projects and probably why I have so many things going on at once, because I can't remember to go BACK to the one I was working on before and then I get started on something new.


Here's the pink quilt on the ironing board waiting to get the seams pressed. Oh Well. Someday.


Til then Happy Quilting!!!


Keep checking back, I have pictures for how I load my quilt and baste the quilt to zippers.

Tuesday, December 4, 2007

I'm Back!

Just thought I'd post pictures of the finished quilting! I just did daisies and swirls and stuff. I love it when a quilt just calls for an all-over design. I'm not a pantograph gal, although I do look at some to inspire my all-over designs. However, mostly I go with what will complement the fabric. I usually come up with a design inspired by patterns in the fabric. Thus, the Daisy and swirls. I did use variegated thread from Superior Threads. Awesome stuff!!! I even had a bright pink pre-wound Bottomline bobbin from a variety pack I ordered!! Too GREAT!


I hope to post in the future tips and tricks to help you prepare your quilt to be quilted. For Example, the proper way to put on borders (at least according to your Long Arm quilter). It will help keep the borders from being a wavy mess and finish off your quilt. Also, binding, keeping your block square and any other trick I've learned over the years. So keep

checking back!!

Until then, Happy Quilting! Lauri

Good Morning Neverland!!!!

OK so that's a line from the movie Hook! It's OLD now, but we're exploring new movie options w/the 2 year old, because the family is getting tired of watching all the other animated movies ten thousand times.


Since I started the blog last night, I've had like a hundred ideas running through my head of what to put on it. This morning I did get up and take a picture of what's on the machine. It's a quilt for my friend Niquie. She pieces tons of tops and I have a pile of them in my closet to quilt. She gives away most of her quilts to family and friends. She has a very lucky extended family because most of them have a quilt from her.


So here's her quilt on my A-1 Long Arm. I haven't named my machine like so many quilters have. I find it hard time naming inanimate objects. Oh Well, Poor nameless machine.


Well, tons to do today. I'll get back with you later. Until then.
Happy Quilting!!! Lauri