Showing posts with label Fun and Easy. Show all posts

Thursday, June 2, 2011

Thursday's Thoughts - Birthday Cake, Birthday Cards, and My Mom's Birthday


Red Velvet Cake - Photo from Wikipedia
Update on my Mom:  First thanks for all the emails with such kind thoughts and prayers.  My Mom is getting better everyday.  I will go to her hometown on Friday morning and have lunch with her at the Sub Acute part of the hospital. After lunch, I will help with her transition home and I will stay the weekend.

Mom's birthday is Saturday.  She will be 77!  We will have a small family celebration at her home.  We all love Red Velvet Cake, so I suggested we have that! It has a butter cream frosting!  My Mom would always make it for my brother's birthdays in April.  It was really a special treat, as it was quite a process to make it.  It is not your basic cake. I am not going to make one.  We have found a place to buy it.  Remember I quilt and sew --- I don't bake or cook!  But I do like to eat!


This is a Birthday card I made several years ago for a friend.  I used my embroidery machine to make the words for the card and then tore the edges, so it would look frayed.  Then I stitched them onto the card with a zig zag stitch.  I placed a small piece of double stick tape behind each one to hold it in place when I was stitching.


More Birthday cards...

I shared these today, because you can go to a store and buy a card for someone, but when you make something ... you give away your heart...


My Mom and I would spend hours making these fabric cards on our weekends together.  It was always fun to see how they would turn out.  Sometimes I would think they weren't perfect and my Mom would say they don't have to be perfect.  That's what makes them unique.
So save those little corners and scraps from your quilts and just stitch them onto a card stock.  You don't have to be an artist.  Just place them on and stitch.  You also don't have to have an embroidery machine to make the words.  Just write them!


On this card I used a feather stitch and another type of feathery zig zag.  I stitched around the edges and on the fabric pieces too.


This one, I used a leaf embroidery stitch and the feather stitch.


I really enjoy making the cards for family and friends.


I hope this inspires you to use all your little scraps and give your heart to your family and friends on their birthdays.


Don't forget to enter the drawing for the Double Double Quilting Giveaway
2 winners and 2 prizes! Please share it, tweet it and blog it!   
Thanks!   Marcia


Tuesday, April 26, 2011

Hodgepodge Patchwork Tuesday - Hot Pads or Potholders - Quilt as You Sew


My cousin Randy asked me if I ever make hot pads or oven potholders?  He said he doesn't like the glove style oven mitts.  So I decided to make Randy a hot pad for this week's Hodgepodge Patchwork Tuesday.

So here is my quick version of how to do "quilt as you sew" to make a fast hot pad.
I used red thread and odd colored strips, so you can see how it goes together.
I cut a piece of heat resistant batting in a 9 inch square.
Then I cut the backing fabric in the green tye dye fabric about 12 inches square.  I wanted to make sure it was at least 1 1/2 inches larger on all four sides.  Place the backing fabric with the wrong side of the fabric up against the batting.

Then I just grabbed some strips from my strip drawer.  Some were 1 inch wide and some were 2 inches wide and some weren't even cut straight.

Follow along with the photo instructions....Place strips on batting with the pretty sides together and stitch.  Then press open and flat.  The add next strip and next strips until you have the batting covered.

Hot pad/pot holder


.
I stitched with a red thread, so you can see the stitching lines.  Check the back to make sure it is laying out flat. If not press the back side out flat.

Flip over and fold the backing fabric out of the way so you can trim the strips. Rotary cat all four sides off, but not the backing fabric.
Your hot pad should look like this after you trim the strips.


Flip is over so you can see the back stitching lines.
Snip all the loose threads!
Flip back to the front and with the rotary cutter trim
you have 1 1/4 inches on all four sides.
Press up one quarter inch all four sides.
Then bring the backing fabric up and over to the front.  Pin at each corner after pressing.
Pin sides to hold in place as you sew.  Pull out the pins as you sew - do not sew over the pins.
I use a Zig Zag stitch as I feel it holds best and is forgiving if you don't sew perfectly straight. You could use an embroidery stitch also.  See how I stitched the corners in the next photos.
Here it is Randy!  Hope you like it.  I am making another one to match it, so you have one for each hand.

You could use this method of quilting to make place mats and table runners.  It gets a little tricky keeping the back flat the larger you make something.


Share your ideas in the comments... love to hear from you!

Only a few more days until May!  Are you joining us in the May for Me Celebration?


Later this week I will share my list of what I plan to do in May!  Oh yes there will be more Giveaways too!
Thanks for following along!

Marcia


* NOTE:  I am sharing a construction method for making a Hot Pad or Potholder.  This is not a pattern and I did not get the pattern from somewhere else.  I am just sharing how I do quilt as you sew.  Have fun making this sewing project.  Any questions email me  at  Marcia@craftysewing.com.

Tuesday, April 19, 2011

Hodgepodge Patchwork Tuesday - What are 2 Things a Quilter needs in the Spring?

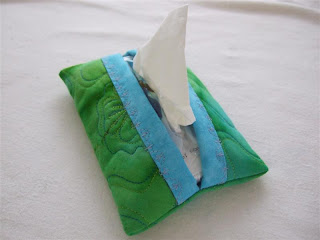
A quilter needs a quilted tissue holder and a fabric cover for her hanging planters!

This is the link to the Photo Gallery where the tutorial on how to make your own fabric cover for your hanging planters. Click on Quilts in the Garden Photo.

Follow along with the photos and learn how to make the quilted tissue holder here.... 

Cut a quilted piece of fabric 6" X 7" . Or wrap the fabric around your tissue package to make sure it will fit.
  Cut 2 binding strips for the 6" sides.
Stitch the binding on the wrong side of your quilted fabric.
Press out flat first.
Then flip over and press binding around to the front side of your quilted fabric.
Embroidery stitch the binding in place on both sides.
Zig Zag stitch the 7 inch sides - the raw edges,
Press the bound edges together with the right side (the pretty side) on the inside, as shown in the photo, so that they meet in the center.
 Stitch both ends about 1/4 inch seam allowance.
Stitch twice and Zig Zag the edges again.
 
Clip all four corners.
Turn right side out!
  Press it nice a flat so the center meets.
This is a very simple project to make.  It took me about 20 minutes to make it and I was taking photos at the same time.   The little quilted tissue holder would make great get well gift.  Or just make one for yourself!

Today's May for Me Celebration Giveaway is a 4 pack of Fabric and Toes Note Cards. (Value$6.00)
Leave a comment today  - Answer this question:  "What does a quilter need in the Spring? "  If you leave a comment, I will enter you in a drawing for the the Fabric and Toes Note Cards!  
Sorry - Only US and Canada Free shipping.  International winners shipping charges apply. 
Drawing Monday, April 25th!