Showing posts with label Quilt Block. Show all posts

Sunday, May 29, 2011

Hey There Hexy Ladies

 Last post I mentioned that a few days ago we travelled to PEI.  Well, it takes 3.5 hours to drive from our place to Charlottetown, so I needed a little something to do on the drive ...
-
Let me introduce these hexy ladies.  Those are 1 inch hexagons.
 I am making novelty I-Spy type hexies as my summer travel project.  They are just to make as we're driving somewhere.  I have an end project in mind, a hexagon I-Spy quilt.  It won't all be hexagons, but rather hexies appliqued in a pattern.  I have the idea in my head and I think it will work.  I probably need 192 hexagons for a good lap-sized quilt.
 It just takes the smallest of scraps to make these.  
Fun!  Do you have a summer travel project?
-
Happy Quilting!
-
I'm linking up with {Sew} Modern Monday and Made by You Monday
-
And since this is my summer travel work in progress, I'm linking up with WIP Wednesday.

Wednesday, May 25, 2011

I Spy Quilt Top Layout

 It seems I have been working on this I Spy quilt a long time ... or maybe it just feels that way because the kids keep asking me if it's done yet.  I love their excitement about it.  And it is finally close to finished.
 This is the first time I've shown it with the large squares sewn together.  There are 16 blocks made of 25  4 inch squares each and sashed in 16 different colours of Kona solids.  The sashing is 2.5 inches wide. 
 Across the top I'm adding this band of squares along with the letters spelling "I Spy."  The fabric I had to fussy cut the letters from only had lowercase letters so I actually used the lowercase "l" as an uppercase "I."  I just couldn't use a lowercase "i" so thankfully there was a solution.  I am kind of old school and can't stand seeing "I" as a word as lowercase.  Know what i mean ... ;-)
 So the quilt is currently at 469 squares, all different.  I certainly used many of the same fabrics over (good ones with large repeats), but the exact image isn't the same in any square.  And I thought I was done, but I want another 69 squares to put a border across the bottom.  It will be just like the one on the top to balance it out and make the whole thing more rectangular.  I have almost enough squares cut now.
-
When I told my husband I was adding the last *few* squares, he said, "Why stop now, why not just go for 1000 squares? Then you could cover the whole room."  (Cut to me rolling my eyes)  I told him that smarty pants comments like that would end up on the blog. Anyway, as far as the quilt goes I will admit I am very much the sort to say, well I already put a lot of time in it, so what's a little more? It's totally worth it.  
Anyway, I LOVE it and hopefully within a couple of weeks I will be able to show it all quilted and bound.  (It will be going out to be quilted ... it is going to be about 90 by 108 I think ... )
-
I'm linking up to W.I.P. Wednesday. And I'm going to try two new linkies for fun -- The Sundae Scoop, and The Sisters Sunday Link Party!  Happy Quilting! 

Friday, May 13, 2011

Not a Wink Quilt for Bloggers Quilt Festival

Hi, welcome! I finished the binding on this quilt just in time for it to be my virtual exhibit in the Bloggers Quilt Festival. I've named it the Not a Wink Quilt because it is so wild, bright and crazy it just might keep you up all night -- hence Not a Wink of sleep.
It is an all-scrap quilt except for the sashing. It is almost 100 inches square, for our queen-sized bed, so it was a great scrapbuster.

When I first decided to make a scrap quilt, I thought a lot about what type of square I would like to make. I finally came up with my own design for a block which is a variation of a traditional railfence. I call it the Scrapbuster Random Railfence Block and a full tutorial to make it is here. It uses 2.5 inch strips of any length and makes 12 inch squares. I think what made me the happiest about it is that although the method is very straightforward, no two blocks turn out the same.

So after I had my block design decided, I made 36 squares and watched my scrap pile shrink, shrink, shrink.

I decided to use sashing to set the squares apart. As you can see I went with a nice subtle sashing, hee, hee. If you've been by the blog before, you know I love bright colours, but this hot pink polka dot sashing was even a little out there for me. I almost changed my mind about it, but I'm glad I didn't.

I really like the cat in this square. Because I had lots of novelty fabric scraps, the quilt has a bit on an I-Spy feature which my kids like.

The backing is a print called Heart Throb by Free Spirit. It is bound in a hot pink which matched the sashing.

Because of the massive size, I sent it out to be quilted. I tried a new long-arm quilter this time, Gilbert Crevier of 3A Quilting, and he did a great job. I chose a pantograph that says "Love" which I think was an unexpected choice, and I realised after it may have been intended more for borders than an overall pattern, but I am so happy with how it looks.


Thanks so much for stopping by. If it's your first time here, please feel free to stay a while and browse. Then when you're ready if you click here you can head over to the list of all the participants in the Bloggers Quilt Festival. There are lots and lots of fabulous quilts to see. Happy Quilting!

Wednesday, April 20, 2011

My I-Spy Quilt Block Collection is Growing

So this all started when I decided to participate in an I-Spy swap. I haven't received my 200 different swap blocks yet, but in the meantime, I've been getting squares of my own ready -- and the pile is GROWING. At this rate I may honestly be able to make a queen-sized I-Spy quilt with no two squares alike ...

Above are some of my favourite squares which I've cut from my own stash and scraps.

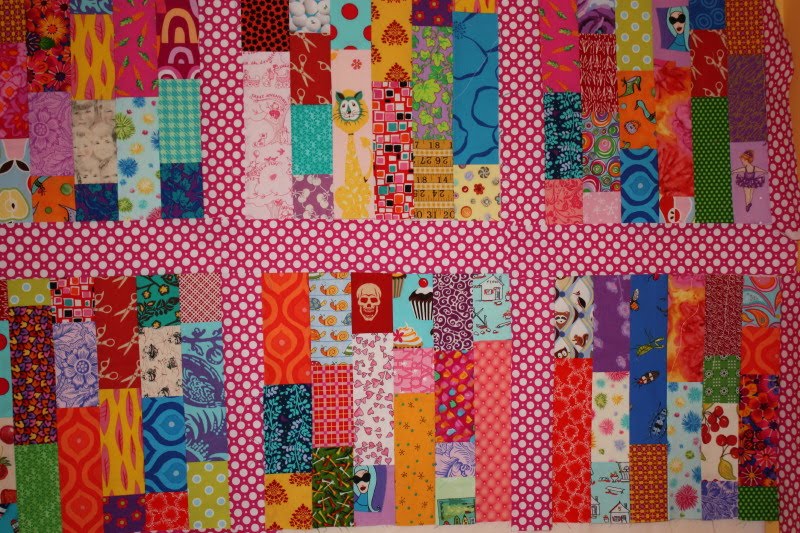
And a few more from my own fabrics. I love squares that feature a single larger fussy cut like the baby or flowers, as I think they will help break up the wild busyness of the whole quilt.
And because we all know that quilters are typically generous sorts, my friend Tanya showed up at my house with the squares above ...

And these too.

And then Rachel of Not-So-Plain Jane volunteered to send me "some" charms. Little did I know she'd send 50 all different ones!

Look at all the great colour in these that she sent!

Plus I still have lots more fabric to cut -- scraps from my Mom, Tanya and from a scrap swap I was in.

This quilt is already so FUN and I haven't even sewed a stitch yet.

I'm linking up with WIP Wednesday since this quilt is definitely a work in progress.

Happy Quilting!

Tuesday, April 5, 2011

Easy Scrappy Strips and Bricks Block Tutorial

Guess what? I still have scraps left. Way, way, way less than what I had, but they're not quite gone. YET. I have a pile of solid scraps that need to be dealt with. So here's what I'm doing to use up more strips of patterned fabric AND my bigger solid pieces in case you want to try too ...

-

It's a super easy block that will finish at 10 inches.

First off, cut your scrappy patterned fabric strips into pieces that are 2.5 by 5.5 inches. Cut lots so you'll have a variety to choose from for each square.

-

Then cut your solid pieces into bricks that are 5.5 by 10.5 inches.

For each block you will need five little pieces and one big one. Either choose each piece carefully or just randomly grab whatever is closest. ;-) Sew your five small pieces together as shown. Use a 1/4 inch seam. Press your seams. Then sew this set of strips to the solid colour brick again using a 1/4 inch seam. All done. A 10.5 inch block that will finish in the quilt at 10 inches. See, super easy. I know you probably didn't even need the tutorial since it was so simple and straight-ahead, but it makes me feel useful to write it out. Hee, hee. Then, once you have a few, the fun of arranging begins. So many possibilities! These are just a few. A multi-colour windmill block as shown above ... Maybe this way? Or this? Or even on point?

-

Ladies and gentlemen, start your machines! May the scrapbusting commence!

-

Thanks for stopping by. Happy Quilting! And of course I'm linking here ...

Fresh Poppy Design

Friday, April 1, 2011

Not a Wink Quilt

Happy Friday! First off, for anyone stopping by the blog for the first time, this post and this quilt are not an April Fool's joke. ;-) Technicolour quilts made with wild and crazy fabrics are pretty much standard here. And speaking of that, I've decided to name this quilt the 'Not a Wink Quilt' -- because anyone attempting to sleep under it won't get even a wink of sleep since it's so loud. It's big. Really big. About 100 inches square I believe, and it's for our queen-size bed. It is made of 36 Scrappy Random Railfence Blocks (tutorial here) along with sashing and a scrappy border. It made a serious dent in my scrap pile! Woohoo!!! The only thing I bought for this was the sashing. (2 yards, in case you wish to do the same thing I've done here. The sashing is cut at 2.5 inches). I honestly had a couple of moments of uncertainty about the pink polka dot sashing ... but I'm glad I didn't change my mind. The quilt really is a memory scrapbook of all the quilts I've made over the past year. There are lots of little I-Spy type things for the kids to find. This picture shows the border. It is a simple piano key border of more 2.5 inch scrap strips cut at 8.5 inches long. I'm going to send it out to be quilted. Even though I'm feeling more confident with my machine quilting lately, I am not brave enough to tackle this ... my frustration threshold is only so high. - It's great to have my sewing machine again. Backing for this quilt is the next project. - Thanks for stopping by!

Tuesday, March 22, 2011

Operation Complete Scrap Depletion: Progress

I've been making more of the scrappy random railfence blocks (tutorial is here). More, as in lots more. I have 36 now, which is enough for a quilt.
I am really happy with how they turned out. I find them to be fast and fun to make, and I really like the step-by-step assembly line aspect of them. Plus, they really are scrap eaters! My pile o' scraps is shrinking, shrinking, shrinking ...
They are definitely a bit on the busy, lively side though, so I decided that rather than simply place them all block to block I am going to add some sashing between them. This will also make the quilt larger as I'm aiming for a queen size quilt for our bed.
-
The dots above were the three fabrics I decided to choose between for sashing. They will be the only thing in the quilt that isn't a scrap. Now, if you're thinking: Didn't she just say the blocks were already busy and lively, how on earth are any of those sashings going to calm things down? Well, I admit the quilt will be far from calm, but at least the blocks will be separated, and set apart as individual squares rather than just a big sea of scraps.
Here's a picture of the sashing test run. Some notes on my thought process:
1. The yellow looks great.
2. I thought that the green would be my choice, but surprisingly it seemed to just zap the life out of the colours of fabric around it. You know how that seems to happen sometimes.
3. The pink looked wild and crazy and way over the top.
-
So I asked my family what they thought.
1. The colour I ended up going with was my husband's third choice.
2. It was my six-year-old son's second choice.
3. It was my three-year-old daughter's first choice.

Hint, hint ...
Hee, hee. We'll see. (Those pieces aren't sewn yet, they're just hanging on the design wall)
-
Thanks for stopping by.
-
Welcome to my new followers. Per usual, I pledge to work hard to attempt to keep the content here creative and fun.
-
Happy Quilting!

WIP Wednesday at Freshly Pieced